- A consumer web part - User Interface
- Service Provider (e.g. a WCF service)
- Service Proxy - acts as a communication channel between the front end and service provider.
As mentioned, I have never used WCF before. Therefore I will go through the steps to create a very simple WCF service and host it in IIS. If you are familiar with WCF, you might like to skip to the next post.
Create a Service Contract and Implementation
1.) In Visual Studio, create new "Class Library" project and call it "WCFSample"

2.) We will change the assembly name and default namespace by right clicking the "WCFSample" project and enter "Microsoft.ServiceModel.WCFSample" for the "Assembly name" and "Default namespace".

3.) Add the "System.ServiceModel" reference to your project.
4.) Let's create our service contract and define an operation that we are going to expose. Start by either renaming the default Class1.cs or create a new class called "ITestService.cs" and have the follow code:
using System.Collections.Generic;
using System.Linq;
using System.ServiceModel;
using System.Text;
namespace Microsoft.ServiceModel.WCFSample
{
[ServiceContract()]
public interface ITestService
{
[OperationContract]
string Hello(string name);
}
}
5.) Next we will implement the contract by creating a new class called "TestService.cs" and put the following code in:
using System.Collections.Generic;
using System.Linq;
using System.Text;
namespace Microsoft.ServiceModel.WCFSample
{
public class TestService : ITestService
{
public string Hello(string name)
{
return string.Format("Hello {0}!!!", name);
}
}
}
Create a WCF Service
1.) Next, we will create a WCF Service. To do that, create a new project in the WCFSample solution.

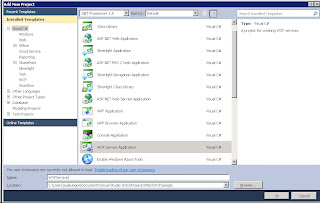
2.) This time we will use the "WCF Service Application" project template and call it "WCFService".
3.) Add a reference to the WCFSample project that we have completed above.
4.) Remove IService1.cs and Service1.svc.cs (expand Service1.svc).
5.) Rename Service1.svc to Service.svc.
6.) Since we have already implemented the service in the Microsoft.ServiceModel.WCFSample assembly, we will reference it in Service.svc. To do this, replace the ServiceHost tag to:
7.) And there you go, we have completed the WCF service. However we still need to add some information to the web.config.
Configuring WCF Service Endpoints and Behaviours
We will use the "WCF Service Configuration Editor" that comes with Visual Studio 2010 (or 2008).
1.) In Visual Studio, go to "Tools" > "WCF Service Configuration Editor".
2.) In WCF Service Configuration Editor, go to "File" > "Open" > "Config File..."
3.) Open the "Web.Config" in the WCFService project.
4.) The configuration contains the default service "WCFService.Service1". Right click and delete this as we will create a new one.
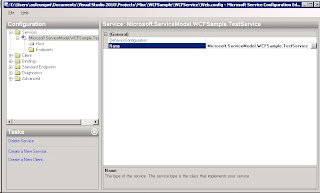
5.) Right click the "Service" node and select "New Service". A new service will be created and its information will show up in the right hand panel.
6.) Select the name property and click the ellipsis button. This will open up a "Service Type Browser".
7.) Browse to the bin folder of the WCFService project and select the service assembly "Microsoft.ServiceModel.WCFSample.dll".
8.) Double click the assembly and then double click "Microsoft.ServiceModel.WCFSample.TestService".

Next we define a communication endpoint:
1.) Right click "Endpoints" and select "New Service Endpoint"
2.) Set the "Address" property to http://localhost:8082/Service.svc
3.) Set the "Binding" property to "basicHttpBinding"
4.) Set the "Contract" property to our service contract by selecting the "Microsoft.ServiceModel.WCFSample.dll" assembly and pick "Microsoft.ServiceModel.WCFSample.ITestService"
Next we need to define the bahaviour:
1.) Expand the "Advanced" node.
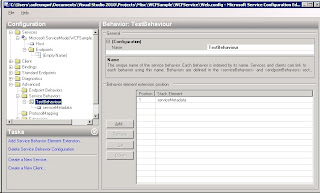
2.) Right click the "Service Bahaviours" node and select "New Service Bahaviour Configuration".
3.) Rename the new bahaviour to "TestBahaviour".
4.) Under "Bahaviour element extension position", click the "Add..." button.
5.) Select "serviceMetadata" and click "Add".
6.) Double click "serviceMetadata" in the list.
7.) Set "HttpGetEnabled" to "True".

We have succesfully defined a service bahaviour.
The next step is to set our service bahavior to the newly created behaviour.
1.) Expand the "Service" node and select "Microsoft.ServiceModel.WCFSample.TestService".
2.) In the "BahaviourConfiguration" property, select "TestBehaviour".
We have completed the configuration of our WCF service and it is ready to deploy in IIS.
Deploying WCF Service to IIS
1.) Create a new web site in IIS at port 8082.
2.) Go to the WCFService project folder and copy the following to the web site folder:
- Service.svc
- Web.config
- The whole "bin" folder
3.) Try to access "http://localhost:8082/Service.svc and you should get something like this:
Testing the deployed WCF service
You can start the the hosted service by writing a simple console application.
1.) In the same solution, create a new "Console Application" project called "WCFClient".
2.) Next we will use svcutil.exe to generate a proxy and a configuration file for the service:
3.) Run Command Prompt
4.) Change directory to the WCFClient project folder
5.) Execute the following command:
6.) 2 new files have been generated in the WCFClient project folder.
7.) In the WFCClient project, add the SampleServiceProxy.cs and app.config.
8.) Here is the source code of the WCFClient Program class:
using System.Collections.Generic;
using System.Linq;
using System.ServiceModel;
using System.Text;
namespace WCFClient
{
class Program
{
static void Main(string[] args)
{
TestServiceClient tsc = new TestServiceClient();
Console.WriteLine(tsc.Hello("Egg"));
}
}
}
9.) Run the console application and you should get "Hello Egg!!!" back as a result.
So we now have a very simple WCF service running in IIS. Next we will create the service application and proxy that will invoke the WCF service.

No comments:
Post a Comment